Ideation | Week 10
The project overview was for us to create an AR filter related to Taylor's University and pair it up with an animated microsite. Starting up the project, the ideation stage went a long way as I try throughout the entire week to come up with applicable solutions into the final project of this module. My ideas surrounded from ordinary thoughts like doing a Taylor's graduation filter where user can simulate the feeling of belonging despite being detached from the physical campus, let alone the country itself (the COVID-19 situation also made the idea more applicable and usable).
Throughout my ideation process, I collected a few references so give myself some startup ideas. Not much were found, so I headed over to the Miro Board to drop every creative/non creative ideas of mine and connect them to further points in order to help me evaluate with the decision making process.
 |
| Planning out the project requirements. |
 |
| Taylor's AR filter ideation mind mapping. |
With decision making lasting throughout the week, I collected more references along the way to familiarise myself further with the choices. I first chose the "What kind of student are you?" randomiser-based filter, which is to help students enjoy rolling their luck on the type of student they might be, while inserting stereotypes and humour for Taylors students. Truths be said, I didn't wanted to bring the school's reputation down through humorous and non sense design project, so the plan switched over right away.
While evaluating all the existing ideas I have in mind, I decided to go with the basic "Where to Eat?" idea and bring it to life through additional features and CTA to help people to decide what once the results are shown from the randomiser (in other words, when the cards stop ticking). The idea itself quickly brought life in it so I proceeded to the next phase of sketching, and planning process.
Planning & Sketches | Week 11-12
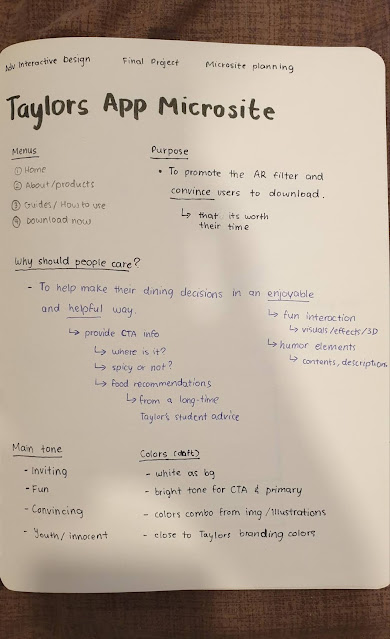
Without much delay, I hopped on the planning and sketching phase of the project. I collected the information that I will need to execute the project before following up with the assets collection.
 |
| Defining project direction and purpose. |
Once the project direction was settled, I head over to plan and starting sketching out the draft wireframes and rough look & feel to the outcomes I'm producing. With a few drafts, I finally found my vision for the project.
 |
| Microsite sketches and drafts. |
 |
| Randomiser card sketches and planning. |
As I final part before heading to the design execution process, I prepared a proposal slide for preparation purposes as it also give me a rough idea of the website copywriting. The finalised project proposal is presented below:
PT 1. SPARK AR
Gathering Assets | Week 12
It all began from a little planning process where I collected all the restaurants I want to work on, including its smaller details, its best dishes, its restaurant tags (cuisines), location (floor and unit number), price range, and wrote a few descriptions.
 |
| Taylor's University active restaurant list Oct-Nov 2020. |
 |
| Preparing and compiling every restaurant details. |
After the completion of the planning phase, I surfed for each restaurant logos and made refinements to the ones that aren't presentable. Most of them are extremely low quality on Google!
 |
| Refining restaurants low quality images from the internet on Adobe Photoshop. |
 |
| Vectorising a few logos on Adobe Illustrator. |
 |
| Framing images for each restaurant. |
 |
| Editing and refining each restaurant photos. |
The restaurants cards were then designed as the extension feature of the randomiser:
 |
| Restaurant cards design. |
Spark AR Execution | Week 13
Since I have all my assets completely prepared as well the plannings confirmed, I knew exactly what to and worked on developing the AR filter right away.
 |
| Spark AR layers and assets. |
 |
| Spark AR Light reflection patch. |
 |
| Spark AR Screen tap plane (test). |
 |
| Spark AR OnRecord start patch function. |
 |
| Spark AR audio attempts. |
 |
| Spark AR randomiser result patches. |
 |
| Spark AR alternate canvas visibility function patches. |
*The final outcome is placed the bottom section
PT 2. MICROSITE
The microsite production started with a few sketches and wire framing process. I wanted to understand the layout style of the website before getting into the smaller details like making use of design elements. I went for a standard product website UI pattern where the products are displayed in large image beside a few lines of text, preferably catchy tag lines to capture users' attention at first glance, this also means avoiding large body of texts or paragraphs since there's not much of a necessity for it in a smaller scale microsite.
 |
| Image editing for the microsite homepage. Image quality, colors, framing makes up a huge part of a website aesthetic. |
 |
| Microsite design variations. |
 |
| Website wire framing on Figma. |


We provides UI/UX Design and development services that delight your end-users by developing a web & mobile app that aligns with your business goals.
ReplyDelete